• DIY Cabinets Build Your Dream Cabinets and Save Money
    Building your own cabinets might seem like an intimidating project, but with the right steps and guidance, you can create custom cabinets that perfectly fit your space and style. Not only can DIY cabinets save you money, but they also offer a rewarding hands-on experience. Let’s dive into the step-by-step process of creating beautiful, sturdy cabinets that look just like those from high-end stores!
    How to Build Your Own DIY Cabinets
    1. Planning and Preparation: Start With a Solid Foundation
    The first step to building DIY cabinets is thorough planning. Measure the space where your cabinets will go, and remember to account for any baseboard or molding that might affect the fit. Accurate measurements are essential to ensure your cabinets align perfectly with the walls and floor​.
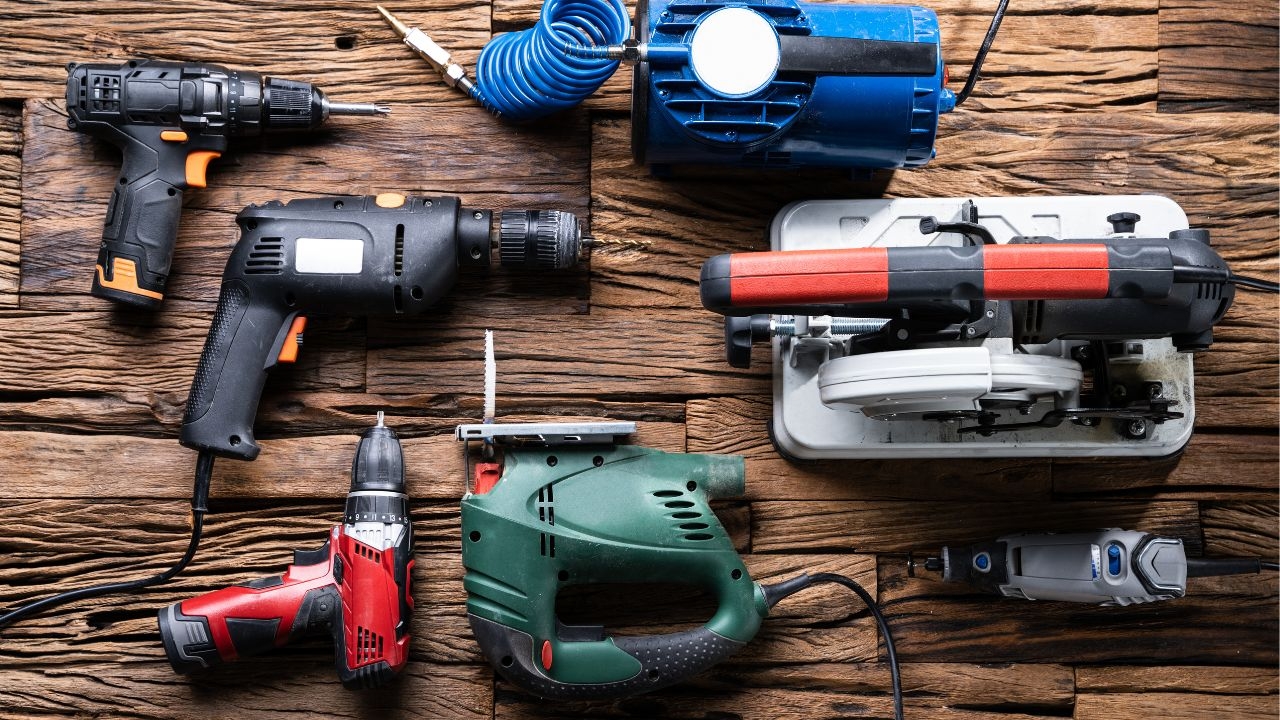
    Choose the right materials for your project. Plywood is a popular choice due to its strength and ease of use. You’ll also need basic tools like a drill, saw, clamps, and screws, as well as safety gear. Since you’re likely using power tools, don’t skip out on goggles and gloves—they’re essential for keeping you safe while you work​.
    2. Building the Cabinet Frame:
    Now it’s time to cut the plywood and assemble the cabinet frame. For best results, use a table saw or circular saw to make precise cuts on the side panels, top, and bottom pieces. Mark your measurements on the plywood before cutting, and check for accuracy as you go. It’s wise to double-check your cuts to ensure they’re square. Even a small error can lead to a wonky cabinet that’s tough to align during installation​.
    For assembly, pocket hole joinery is a favorite among DIY enthusiasts. It’s easy, secure, and allows you to hide screws, leaving a smooth finish. Glue and screw the pieces together, using clamps to hold them in place until the glue dries. This will create a sturdy frame that can handle the weight of shelves and anything you plan to store​.
    Adding Toe Kicks
    Toe kicks are those recessed areas at the bottom of kitchen cabinets that allow you to stand closer to the counter. They make a big difference in comfort, especially when you’re working for long periods. Cut notches into the bottom front corners of the side panels to add toe kicks. This simple addition enhances the usability and professional appearance of your cabinets​.

    3. Installing Shelves and Dividers:
    With the frame ready, it’s time to add shelves and dividers. Fixed shelves are easiest to install—just glue and screw them into place inside the cabinet. If you want adjustable shelving, consider using a shelf pin jig. This tool allows you to drill evenly spaced holes on the side panels, providing flexibility for moving shelves up or down later​.
    For extra functionality, you can incorporate pullout shelves or drawers. These are especially useful in deep cabinets, where it can be hard to reach items at the back. Pullout shelves add convenience and maximize storage by bringing everything within easy reach​.
    4. Attaching the Back and Face Frame:
    Cut a piece of plywood for the cabinet back, ensuring it fits snugly between the sides. Glue and nail it in place to stabilize the cabinet. This back panel prevents the cabinet from twisting and adds durability.
    Next, you’ll want to attach a face frame if you prefer a traditional look. The face frame covers the edges of the plywood and creates a more polished appearance. Cut pieces of wood for the face frame, then use pocket screws and glue to attach them to the front of the cabinet. This step not only improves aesthetics but also reinforces the structure​.https://www.cabinetdiy.com/
    DIY Cabinets Build Your Dream Cabinets and Save Money Building your own cabinets might seem like an intimidating project, but with the right steps and guidance, you can create custom cabinets that perfectly fit your space and style. Not only can DIY cabinets save you money, but they also offer a rewarding hands-on experience. Let’s dive into the step-by-step process of creating beautiful, sturdy cabinets that look just like those from high-end stores! How to Build Your Own DIY Cabinets 1. Planning and Preparation: Start With a Solid Foundation The first step to building DIY cabinets is thorough planning. Measure the space where your cabinets will go, and remember to account for any baseboard or molding that might affect the fit. Accurate measurements are essential to ensure your cabinets align perfectly with the walls and floor​. Choose the right materials for your project. Plywood is a popular choice due to its strength and ease of use. You’ll also need basic tools like a drill, saw, clamps, and screws, as well as safety gear. Since you’re likely using power tools, don’t skip out on goggles and gloves—they’re essential for keeping you safe while you work​. 2. Building the Cabinet Frame: Now it’s time to cut the plywood and assemble the cabinet frame. For best results, use a table saw or circular saw to make precise cuts on the side panels, top, and bottom pieces. Mark your measurements on the plywood before cutting, and check for accuracy as you go. It’s wise to double-check your cuts to ensure they’re square. Even a small error can lead to a wonky cabinet that’s tough to align during installation​. For assembly, pocket hole joinery is a favorite among DIY enthusiasts. It’s easy, secure, and allows you to hide screws, leaving a smooth finish. Glue and screw the pieces together, using clamps to hold them in place until the glue dries. This will create a sturdy frame that can handle the weight of shelves and anything you plan to store​. Adding Toe Kicks Toe kicks are those recessed areas at the bottom of kitchen cabinets that allow you to stand closer to the counter. They make a big difference in comfort, especially when you’re working for long periods. Cut notches into the bottom front corners of the side panels to add toe kicks. This simple addition enhances the usability and professional appearance of your cabinets​. 3. Installing Shelves and Dividers: With the frame ready, it’s time to add shelves and dividers. Fixed shelves are easiest to install—just glue and screw them into place inside the cabinet. If you want adjustable shelving, consider using a shelf pin jig. This tool allows you to drill evenly spaced holes on the side panels, providing flexibility for moving shelves up or down later​. For extra functionality, you can incorporate pullout shelves or drawers. These are especially useful in deep cabinets, where it can be hard to reach items at the back. Pullout shelves add convenience and maximize storage by bringing everything within easy reach​. 4. Attaching the Back and Face Frame: Cut a piece of plywood for the cabinet back, ensuring it fits snugly between the sides. Glue and nail it in place to stabilize the cabinet. This back panel prevents the cabinet from twisting and adds durability. Next, you’ll want to attach a face frame if you prefer a traditional look. The face frame covers the edges of the plywood and creates a more polished appearance. Cut pieces of wood for the face frame, then use pocket screws and glue to attach them to the front of the cabinet. This step not only improves aesthetics but also reinforces the structure​.https://www.cabinetdiy.com/
    RTA Kitchen Cabinets, RTA Cabinets, Ready To Assemble Kitchen Cabinets - Cabinet DIY
    RTA Kitchen Cabinets, RTA Cabinets, Ready To Assemble Kitchen Cabinets. Cabinet DIY has the widest selection, RTA Cabinets with multiple colors of kitchen design and matching bathroom cabinets available also.
    0 Commenti 0 condivisioni 299 Views 0 Anteprima
  • DIY Cabinets Build Your Dream Cabinets and Save Money
    Building your own cabinets might seem like an intimidating project, but with the right steps and guidance, you can create custom cabinets that perfectly fit your space and style. Not only can DIY cabinets save you money, but they also offer a rewarding hands-on experience. Let’s dive into the step-by-step process of creating beautiful, sturdy cabinets that look just like those from high-end stores!
    How to Build Your Own DIY Cabinets
    1. Planning and Preparation: Start With a Solid Foundation
    The first step to building DIY cabinets is thorough planning. Measure the space where your cabinets will go, and remember to account for any baseboard or molding that might affect the fit. Accurate measurements are essential to ensure your cabinets align perfectly with the walls and floor​.
    Choose the right materials for your project. Plywood is a popular choice due to its strength and ease of use. You’ll also need basic tools like a drill, saw, clamps, and screws, as well as safety gear. Since you’re likely using power tools, don’t skip out on goggles and gloves—they’re essential for keeping you safe while you work​.
    2. Building the Cabinet Frame:
    Now it’s time to cut the plywood and assemble the cabinet frame. For best results, use a table saw or circular saw to make precise cuts on the side panels, top, and bottom pieces. Mark your measurements on the plywood before cutting, and check for accuracy as you go. It’s wise to double-check your cuts to ensure they’re square. Even a small error can lead to a wonky cabinet that’s tough to align during installation​.
    For assembly, pocket hole joinery is a favorite among DIY enthusiasts. It’s easy, secure, and allows you to hide screws, leaving a smooth finish. Glue and screw the pieces together, using clamps to hold them in place until the glue dries. This will create a sturdy frame that can handle the weight of shelves and anything you plan to store​.
    Adding Toe Kicks
    Toe kicks are those recessed areas at the bottom of kitchen cabinets that allow you to stand closer to the counter. They make a big difference in comfort, especially when you’re working for long periods. Cut notches into the bottom front corners of the side panels to add toe kicks. This simple addition enhances the usability and professional appearance of your cabinets​.

    3. Installing Shelves and Dividers:
    With the frame ready, it’s time to add shelves and dividers. Fixed shelves are easiest to install—just glue and screw them into place inside the cabinet. If you want adjustable shelving, consider using a shelf pin jig. This tool allows you to drill evenly spaced holes on the side panels, providing flexibility for moving shelves up or down later​.
    For extra functionality, you can incorporate pullout shelves or drawers. These are especially useful in deep cabinets, where it can be hard to reach items at the back. Pullout shelves add convenience and maximize storage by bringing everything within easy reach​.
    4. Attaching the Back and Face Frame:
    Cut a piece of plywood for the cabinet back, ensuring it fits snugly between the sides. Glue and nail it in place to stabilize the cabinet. This back panel prevents the cabinet from twisting and adds durability.
    Next, you’ll want to attach a face frame if you prefer a traditional look. The face frame covers the edges of the plywood and creates a more polished appearance. Cut pieces of wood for the face frame, then use pocket screws and glue to attach them to the front of the cabinet. This step not only improves aesthetics but also reinforces the structure​.
    5. Finishing Touches:
    It’s time for the details that make your cabinet look professional. Start with edge banding, a simple technique for covering the exposed edges of plywood. Iron-on edge banding is widely available and easy to apply, giving your cabinets a clean, finished look.
    After that, sand the entire cabinet to smooth any rough spots and prepare it for finishing. Depending on your design preference, you can paint or stain the wood. Paint offers a sleek, modern look, while stain highlights the natural grain and adds warmth. Apply multiple coats, allowing ample drying time between each, to achieve a durable, professional finish​.
    6. Installing Hardware:
    Hardware is the icing on the cake. Choose handles, knobs, and hinges that complement your overall design. Installing the hardware can be surprisingly satisfying; it’s the final step that brings your cabinets to life. Use a drill to attach the handles and hinges, ensuring they are aligned and secure​.https://www.cabinetdiy.com/
    DIY Cabinets Build Your Dream Cabinets and Save Money Building your own cabinets might seem like an intimidating project, but with the right steps and guidance, you can create custom cabinets that perfectly fit your space and style. Not only can DIY cabinets save you money, but they also offer a rewarding hands-on experience. Let’s dive into the step-by-step process of creating beautiful, sturdy cabinets that look just like those from high-end stores! How to Build Your Own DIY Cabinets 1. Planning and Preparation: Start With a Solid Foundation The first step to building DIY cabinets is thorough planning. Measure the space where your cabinets will go, and remember to account for any baseboard or molding that might affect the fit. Accurate measurements are essential to ensure your cabinets align perfectly with the walls and floor​. Choose the right materials for your project. Plywood is a popular choice due to its strength and ease of use. You’ll also need basic tools like a drill, saw, clamps, and screws, as well as safety gear. Since you’re likely using power tools, don’t skip out on goggles and gloves—they’re essential for keeping you safe while you work​. 2. Building the Cabinet Frame: Now it’s time to cut the plywood and assemble the cabinet frame. For best results, use a table saw or circular saw to make precise cuts on the side panels, top, and bottom pieces. Mark your measurements on the plywood before cutting, and check for accuracy as you go. It’s wise to double-check your cuts to ensure they’re square. Even a small error can lead to a wonky cabinet that’s tough to align during installation​. For assembly, pocket hole joinery is a favorite among DIY enthusiasts. It’s easy, secure, and allows you to hide screws, leaving a smooth finish. Glue and screw the pieces together, using clamps to hold them in place until the glue dries. This will create a sturdy frame that can handle the weight of shelves and anything you plan to store​. Adding Toe Kicks Toe kicks are those recessed areas at the bottom of kitchen cabinets that allow you to stand closer to the counter. They make a big difference in comfort, especially when you’re working for long periods. Cut notches into the bottom front corners of the side panels to add toe kicks. This simple addition enhances the usability and professional appearance of your cabinets​. 3. Installing Shelves and Dividers: With the frame ready, it’s time to add shelves and dividers. Fixed shelves are easiest to install—just glue and screw them into place inside the cabinet. If you want adjustable shelving, consider using a shelf pin jig. This tool allows you to drill evenly spaced holes on the side panels, providing flexibility for moving shelves up or down later​. For extra functionality, you can incorporate pullout shelves or drawers. These are especially useful in deep cabinets, where it can be hard to reach items at the back. Pullout shelves add convenience and maximize storage by bringing everything within easy reach​. 4. Attaching the Back and Face Frame: Cut a piece of plywood for the cabinet back, ensuring it fits snugly between the sides. Glue and nail it in place to stabilize the cabinet. This back panel prevents the cabinet from twisting and adds durability. Next, you’ll want to attach a face frame if you prefer a traditional look. The face frame covers the edges of the plywood and creates a more polished appearance. Cut pieces of wood for the face frame, then use pocket screws and glue to attach them to the front of the cabinet. This step not only improves aesthetics but also reinforces the structure​. 5. Finishing Touches: It’s time for the details that make your cabinet look professional. Start with edge banding, a simple technique for covering the exposed edges of plywood. Iron-on edge banding is widely available and easy to apply, giving your cabinets a clean, finished look. After that, sand the entire cabinet to smooth any rough spots and prepare it for finishing. Depending on your design preference, you can paint or stain the wood. Paint offers a sleek, modern look, while stain highlights the natural grain and adds warmth. Apply multiple coats, allowing ample drying time between each, to achieve a durable, professional finish​. 6. Installing Hardware: Hardware is the icing on the cake. Choose handles, knobs, and hinges that complement your overall design. Installing the hardware can be surprisingly satisfying; it’s the final step that brings your cabinets to life. Use a drill to attach the handles and hinges, ensuring they are aligned and secure​.https://www.cabinetdiy.com/
    RTA Kitchen Cabinets, RTA Cabinets, Ready To Assemble Kitchen Cabinets - Cabinet DIY
    RTA Kitchen Cabinets, RTA Cabinets, Ready To Assemble Kitchen Cabinets. Cabinet DIY has the widest selection, RTA Cabinets with multiple colors of kitchen design and matching bathroom cabinets available also.
    0 Commenti 0 condivisioni 328 Views 0 Anteprima
  • DIY Cabinets Build Your Dream Cabinets and Save Money
    Building your own cabinets might seem like an intimidating project, but with the right steps and guidance, you can create custom cabinets that perfectly fit your space and style. Not only can DIY cabinets save you money, but they also offer a rewarding hands-on experience. Let’s dive into the step-by-step process of creating beautiful, sturdy cabinets that look just like those from high-end stores!
    How to Build Your Own DIY Cabinets
    1. Planning and Preparation: Start With a Solid Foundation
    The first step to building DIY cabinets is thorough planning. Measure the space where your cabinets will go, and remember to account for any baseboard or molding that might affect the fit. Accurate measurements are essential to ensure your cabinets align perfectly with the walls and floor​.
    Choose the right materials for your project. Plywood is a popular choice due to its strength and ease of use. You’ll also need basic tools like a drill, saw, clamps, and screws, as well as safety gear. Since you’re likely using power tools, don’t skip out on goggles and gloves—they’re essential for keeping you safe while you work​.
    2. Building the Cabinet Frame:
    Now it’s time to cut the plywood and assemble the cabinet frame. For best results, use a table saw or circular saw to make precise cuts on the side panels, top, and bottom pieces. Mark your measurements on the plywood before cutting, and check for accuracy as you go. It’s wise to double-check your cuts to ensure they’re square. Even a small error can lead to a wonky cabinet that’s tough to align during installation​.
    For assembly, pocket hole joinery is a favorite among DIY enthusiasts. It’s easy, secure, and allows you to hide screws, leaving a smooth finish. Glue and screw the pieces together, using clamps to hold them in place until the glue dries. This will create a sturdy frame that can handle the weight of shelves and anything you plan to store​.
    Adding Toe Kicks
    Toe kicks are those recessed areas at the bottom of kitchen cabinets that allow you to stand closer to the counter. They make a big difference in comfort, especially when you’re working for long periods. Cut notches into the bottom front corners of the side panels to add toe kicks. This simple addition enhances the usability and professional appearance of your cabinets​.

    3. Installing Shelves and Dividers:
    With the frame ready, it’s time to add shelves and dividers. Fixed shelves are easiest to install—just glue and screw them into place inside the cabinet. If you want adjustable shelving, consider using a shelf pin jig. This tool allows you to drill evenly spaced holes on the side panels, providing flexibility for moving shelves up or down later​.
    For extra functionality, you can incorporate pullout shelves or drawers. These are especially useful in deep cabinets, where it can be hard to reach items at the back. Pullout shelves add convenience and maximize storage by bringing everything within easy reach​.
    4. Attaching the Back and Face Frame:
    Cut a piece of plywood for the cabinet back, ensuring it fits snugly between the sides. Glue and nail it in place to stabilize the cabinet. This back panel prevents the cabinet from twisting and adds durability.
    Next, you’ll want to attach a face frame if you prefer a traditional look. The face frame covers the edges of the plywood and creates a more polished appearance. Cut pieces of wood for the face frame, then use pocket screws and glue to attach them to the front of the cabinet. This step not only improves aesthetics but also reinforces the structure​.https://www.cabinetdiy.com/
    DIY Cabinets Build Your Dream Cabinets and Save Money Building your own cabinets might seem like an intimidating project, but with the right steps and guidance, you can create custom cabinets that perfectly fit your space and style. Not only can DIY cabinets save you money, but they also offer a rewarding hands-on experience. Let’s dive into the step-by-step process of creating beautiful, sturdy cabinets that look just like those from high-end stores! How to Build Your Own DIY Cabinets 1. Planning and Preparation: Start With a Solid Foundation The first step to building DIY cabinets is thorough planning. Measure the space where your cabinets will go, and remember to account for any baseboard or molding that might affect the fit. Accurate measurements are essential to ensure your cabinets align perfectly with the walls and floor​. Choose the right materials for your project. Plywood is a popular choice due to its strength and ease of use. You’ll also need basic tools like a drill, saw, clamps, and screws, as well as safety gear. Since you’re likely using power tools, don’t skip out on goggles and gloves—they’re essential for keeping you safe while you work​. 2. Building the Cabinet Frame: Now it’s time to cut the plywood and assemble the cabinet frame. For best results, use a table saw or circular saw to make precise cuts on the side panels, top, and bottom pieces. Mark your measurements on the plywood before cutting, and check for accuracy as you go. It’s wise to double-check your cuts to ensure they’re square. Even a small error can lead to a wonky cabinet that’s tough to align during installation​. For assembly, pocket hole joinery is a favorite among DIY enthusiasts. It’s easy, secure, and allows you to hide screws, leaving a smooth finish. Glue and screw the pieces together, using clamps to hold them in place until the glue dries. This will create a sturdy frame that can handle the weight of shelves and anything you plan to store​. Adding Toe Kicks Toe kicks are those recessed areas at the bottom of kitchen cabinets that allow you to stand closer to the counter. They make a big difference in comfort, especially when you’re working for long periods. Cut notches into the bottom front corners of the side panels to add toe kicks. This simple addition enhances the usability and professional appearance of your cabinets​. 3. Installing Shelves and Dividers: With the frame ready, it’s time to add shelves and dividers. Fixed shelves are easiest to install—just glue and screw them into place inside the cabinet. If you want adjustable shelving, consider using a shelf pin jig. This tool allows you to drill evenly spaced holes on the side panels, providing flexibility for moving shelves up or down later​. For extra functionality, you can incorporate pullout shelves or drawers. These are especially useful in deep cabinets, where it can be hard to reach items at the back. Pullout shelves add convenience and maximize storage by bringing everything within easy reach​. 4. Attaching the Back and Face Frame: Cut a piece of plywood for the cabinet back, ensuring it fits snugly between the sides. Glue and nail it in place to stabilize the cabinet. This back panel prevents the cabinet from twisting and adds durability. Next, you’ll want to attach a face frame if you prefer a traditional look. The face frame covers the edges of the plywood and creates a more polished appearance. Cut pieces of wood for the face frame, then use pocket screws and glue to attach them to the front of the cabinet. This step not only improves aesthetics but also reinforces the structure​.https://www.cabinetdiy.com/
    RTA Kitchen Cabinets, RTA Cabinets, Ready To Assemble Kitchen Cabinets - Cabinet DIY
    RTA Kitchen Cabinets, RTA Cabinets, Ready To Assemble Kitchen Cabinets. Cabinet DIY has the widest selection, RTA Cabinets with multiple colors of kitchen design and matching bathroom cabinets available also.
    0 Commenti 0 condivisioni 262 Views 0 Anteprima
  • India Power Tool Market Growth is Driven by Rising Construction Industry

    The construction industry in India has increased the demand for India Power Tool Market Growth from various end-use industries like building & construction, automotive, and shipbuilding. Favorable government policies promoting infrastructure development are encouraging construction activities.

    Power tool manufacturers are expanding their global footprint by setting up manufacturing plants in India. This allows them to cater to the rising local demand and reduce overall manufacturing and logistics costs. Companies are also importing power tools and components to assemble and distribute locally.

    Market Drivers
    The rapid growth of the Indian real estate sector is a key factor driving the India Power Tool Market Size and Trends. According to industry estimates, the country needs approximately 25 million housing units by 2025 to cater to the rising demand.

    Get More Insights: India Power Tool Market
    (https://medium.com/@avantika.cmi/india-power-tool-market-is-estimated-to-witness-high-growth-owing-to-increasing-adoption-of-battery-1225ecf83a2f
    )
    India Power Tool Market Growth is Driven by Rising Construction Industry The construction industry in India has increased the demand for India Power Tool Market Growth from various end-use industries like building & construction, automotive, and shipbuilding. Favorable government policies promoting infrastructure development are encouraging construction activities. Power tool manufacturers are expanding their global footprint by setting up manufacturing plants in India. This allows them to cater to the rising local demand and reduce overall manufacturing and logistics costs. Companies are also importing power tools and components to assemble and distribute locally. Market Drivers The rapid growth of the Indian real estate sector is a key factor driving the India Power Tool Market Size and Trends. According to industry estimates, the country needs approximately 25 million housing units by 2025 to cater to the rising demand. Get More Insights: India Power Tool Market (https://medium.com/@avantika.cmi/india-power-tool-market-is-estimated-to-witness-high-growth-owing-to-increasing-adoption-of-battery-1225ecf83a2f )
    MEDIUM.COM
    India Power Tool Market is Estimated to Witness High Growth Owing to Increasing Adoption of Battery…
    The India power tool market consists of a wide range of tools that are powered by electricity or through engines such as portable drilling…
    0 Commenti 0 condivisioni 201 Views 0 Anteprima
  • Top Wood Carving Tools: Elevate Your Craftsmanship Today

    Elevate your woodworking projects with our top wood carving tools! This article highlights the must-have tools for both novice and experienced carvers. Discover the differences between various chisels, knives, and power tools, and learn how each can enhance your carving experience. We discuss important features to consider when choosing tools, such as ergonomics and blade material. Additionally, find tips on proper usage and maintenance to keep your tools in peak condition. Whether you’re working on detailed sculptures or functional items, investing in quality wood carving tools will take your craftsmanship to the next level!

    Visit Us:-https://www.woodcraft.com/collections/carving-knives
    Top Wood Carving Tools: Elevate Your Craftsmanship Today Elevate your woodworking projects with our top wood carving tools! This article highlights the must-have tools for both novice and experienced carvers. Discover the differences between various chisels, knives, and power tools, and learn how each can enhance your carving experience. We discuss important features to consider when choosing tools, such as ergonomics and blade material. Additionally, find tips on proper usage and maintenance to keep your tools in peak condition. Whether you’re working on detailed sculptures or functional items, investing in quality wood carving tools will take your craftsmanship to the next level! Visit Us:-https://www.woodcraft.com/collections/carving-knives
    0 Commenti 0 condivisioni 31 Views 0 Anteprima

  • Rise of Advanced Cordless Power Tools Market to Boost Productivity

    Key players operating in the Power Tools Market Share include LocumTenens.com, Adecco Group, TeamHealth, Trustaff, Aya Healthcare, Maxim Healthcare Group, CGM Management, Inc., AMN Healthcare, Cross Country Healthcare, Inc., and Envision Healthcare Corporation. These players are focusing on strengthening their product portfolios and expanding into new geographical regions.

    There is potential to develop autonomous Power Tools Market Size and Trends integrated with advanced robotics, AI, and sensors. This will expand their capabilities for complex applications like precision cutting and complicated assembly tasks.
    Power tools have become imperative for construction, renovation, and do-it-yourself (DIY) projects owing to their ability to enhance work efficiency. Power tools include drills, saws, sanders, grinders and other portable power tools that run on electric power.

    Get more insights: Power Tools Market (https://www.newswirestats.com/power-tools-market-analysis/)
    Rise of Advanced Cordless Power Tools Market to Boost Productivity Key players operating in the Power Tools Market Share include LocumTenens.com, Adecco Group, TeamHealth, Trustaff, Aya Healthcare, Maxim Healthcare Group, CGM Management, Inc., AMN Healthcare, Cross Country Healthcare, Inc., and Envision Healthcare Corporation. These players are focusing on strengthening their product portfolios and expanding into new geographical regions. There is potential to develop autonomous Power Tools Market Size and Trends integrated with advanced robotics, AI, and sensors. This will expand their capabilities for complex applications like precision cutting and complicated assembly tasks. Power tools have become imperative for construction, renovation, and do-it-yourself (DIY) projects owing to their ability to enhance work efficiency. Power tools include drills, saws, sanders, grinders and other portable power tools that run on electric power. Get more insights: Power Tools Market (https://www.newswirestats.com/power-tools-market-analysis/)
    0 Commenti 0 condivisioni 602 Views 0 Anteprima
  • power tools dealers in Mumbai, Ultra Touch is a premier supplier of high-quality power tools in Mumbai. We offer a diverse range of premium tools and equipment designed to meet the demands of professionals across various industries. #PowerToolsDealersInMumbai #PowerToolsDealers https://www.ultratouch.co.in/power-tools-dealer-mumbai/
    power tools dealers in Mumbai, Ultra Touch is a premier supplier of high-quality power tools in Mumbai. We offer a diverse range of premium tools and equipment designed to meet the demands of professionals across various industries. #PowerToolsDealersInMumbai #PowerToolsDealers https://www.ultratouch.co.in/power-tools-dealer-mumbai/
    0 Commenti 0 condivisioni 202 Views 0 Anteprima
  • EESS Australia: Ensuring Electrical Safety and Compliance

    When it comes to electrical safety in Australia, the Electrical Equipment Safety System (EESS) plays a crucial role in ensuring that electrical products entering the market meet stringent safety standards and compliance requirements. The EESS is a national framework that regulates the supply of electrical equipment and enforces mandatory product safety standards to protect consumers from potential hazards posed by faulty or non-compliant products.

    Protecting Consumers Through EESS
    The primary objective of the EESS is to prevent electric shock, fire, and other safety risks associated with electrical equipment. By requiring suppliers to comply with specific safety standards and regulatory requirements, the EESS aims to minimize the occurrence of electrical accidents and improve the overall safety of electrical products available on the market. This not only protects consumers from harm but also helps to build trust and confidence in the products they purchase.

    EESS Regulations and Requirements
    One of the key components of the EESS is the Electrical Equipment Safety Regulations, which outline the requirements that suppliers must meet to ensure the safety and compliance of their products. These regulations cover a wide range of electrical equipment, including household appliances, power tools, lighting products, and other electrical goods commonly used in both residential and commercial settings. By setting minimum safety standards and performance criteria, the regulations help to establish a level playing field for suppliers and ensure that only safe and reliable products are available to consumers.

    EESS Registration and Compliance Monitoring
    In addition to the regulatory requirements, the EESS also includes a registration system that allows suppliers to register their electrical products with the relevant regulatory authorities. By registering their products, suppliers demonstrate that their products comply with the necessary safety standards and have undergone testing and certification by accredited testing laboratories. This registration process not only helps to verify the safety and compliance of electrical products but also provides a means for regulatory authorities to monitor the market and take enforcement action against non-compliant products.

    Furthermore, the EESS includes a compliance monitoring program that allows regulatory authorities to conduct random audits and inspections of registered products to verify their safety and compliance. By actively monitoring the market for non-compliant products, regulatory authorities can identify and address safety issues before they pose a risk to consumers. Through a combination of education, enforcement, and market surveillance, the EESS helps to ensure that electrical products meet the necessary safety standards and comply with regulatory requirements.

    Conclusion
    Overall, the EESS plays a vital role in ensuring electrical safety and compliance in Australia. By setting minimum safety standards, requiring product registration, and monitoring compliance with regulatory requirements, the EESS helps to protect consumers from potential hazards posed by faulty or non-compliant electrical products. By working together with suppliers, regulatory authorities, and other stakeholders, the EESS aims to create a safer and more secure marketplace for electrical products, enhancing consumer confidence and promoting a culture of safety and compliance across the industry. https://gkglobalservices.com.au/services/support-for-electrical-suppliers-australian-standards/
    EESS Australia: Ensuring Electrical Safety and Compliance When it comes to electrical safety in Australia, the Electrical Equipment Safety System (EESS) plays a crucial role in ensuring that electrical products entering the market meet stringent safety standards and compliance requirements. The EESS is a national framework that regulates the supply of electrical equipment and enforces mandatory product safety standards to protect consumers from potential hazards posed by faulty or non-compliant products. Protecting Consumers Through EESS The primary objective of the EESS is to prevent electric shock, fire, and other safety risks associated with electrical equipment. By requiring suppliers to comply with specific safety standards and regulatory requirements, the EESS aims to minimize the occurrence of electrical accidents and improve the overall safety of electrical products available on the market. This not only protects consumers from harm but also helps to build trust and confidence in the products they purchase. EESS Regulations and Requirements One of the key components of the EESS is the Electrical Equipment Safety Regulations, which outline the requirements that suppliers must meet to ensure the safety and compliance of their products. These regulations cover a wide range of electrical equipment, including household appliances, power tools, lighting products, and other electrical goods commonly used in both residential and commercial settings. By setting minimum safety standards and performance criteria, the regulations help to establish a level playing field for suppliers and ensure that only safe and reliable products are available to consumers. EESS Registration and Compliance Monitoring In addition to the regulatory requirements, the EESS also includes a registration system that allows suppliers to register their electrical products with the relevant regulatory authorities. By registering their products, suppliers demonstrate that their products comply with the necessary safety standards and have undergone testing and certification by accredited testing laboratories. This registration process not only helps to verify the safety and compliance of electrical products but also provides a means for regulatory authorities to monitor the market and take enforcement action against non-compliant products. Furthermore, the EESS includes a compliance monitoring program that allows regulatory authorities to conduct random audits and inspections of registered products to verify their safety and compliance. By actively monitoring the market for non-compliant products, regulatory authorities can identify and address safety issues before they pose a risk to consumers. Through a combination of education, enforcement, and market surveillance, the EESS helps to ensure that electrical products meet the necessary safety standards and comply with regulatory requirements. Conclusion Overall, the EESS plays a vital role in ensuring electrical safety and compliance in Australia. By setting minimum safety standards, requiring product registration, and monitoring compliance with regulatory requirements, the EESS helps to protect consumers from potential hazards posed by faulty or non-compliant electrical products. By working together with suppliers, regulatory authorities, and other stakeholders, the EESS aims to create a safer and more secure marketplace for electrical products, enhancing consumer confidence and promoting a culture of safety and compliance across the industry. https://gkglobalservices.com.au/services/support-for-electrical-suppliers-australian-standards/
    GKGLOBALSERVICES.COM.AU
    Electrical Approvals | Meet Australian standards
    Meet Australian standards for electrical products. Obtain RCM mark, SAA, EESS, CE certification, and MEPS/GEMS energy registration with ease.
    0 Commenti 0 condivisioni 632 Views 0 Anteprima
  • BI Implementation Services: Your Comprehensive Guide to Choosing the Right BI Tools" helps you select and implement the best BI solutions.
    More info: https://www.linkedin.com/pulse/bi-implementation-services-your-comprehensive-guide-choosing-sheldon/?trackingId=D8M9TRVMSMe1PuQTEakr6w%3D%3D
    #bitools #powerbi #bi #poweritools #businessintelligence #tools #microsoftpowerbi #TechSolutions #TechInnovation
    BI Implementation Services: Your Comprehensive Guide to Choosing the Right BI Tools" helps you select and implement the best BI solutions. More info: https://www.linkedin.com/pulse/bi-implementation-services-your-comprehensive-guide-choosing-sheldon/?trackingId=D8M9TRVMSMe1PuQTEakr6w%3D%3D #bitools #powerbi #bi #poweritools #businessintelligence #tools #microsoftpowerbi #TechSolutions #TechInnovation
    WWW.LINKEDIN.COM
    BI Implementation Services: Your Comprehensive Guide to Choosing the Right BI Tools
    Discover how to choose the right BI tools with our comprehensive guide on BI implementation services.
    0 Commenti 0 condivisioni 644 Views 0 Anteprima
  • Safety Features Incorporated into Milwaukee Power Tools Saws

    Milwaukee Tool is renowned for producing some of the most reliable and durable power tools in the industry. In fact, Milwaukee has been a leader in tool innovation since 1924, continually advancing their designs to ensure not only performance but also user safety. Here, we will explore the various safety features incorporated into Milwaukee power tools saws.

    Read the Blog :

    https://waysource.livepositively.com/safety-features-incorporated-into-milwaukee-power-tools-saws/
    Safety Features Incorporated into Milwaukee Power Tools Saws Milwaukee Tool is renowned for producing some of the most reliable and durable power tools in the industry. In fact, Milwaukee has been a leader in tool innovation since 1924, continually advancing their designs to ensure not only performance but also user safety. Here, we will explore the various safety features incorporated into Milwaukee power tools saws. Read the Blog : https://waysource.livepositively.com/safety-features-incorporated-into-milwaukee-power-tools-saws/
    WAYSOURCE.LIVEPOSITIVELY.COM
    Safety Features Incorporated into Milwaukee Power Tools Saws
    Milwaukee Tool is renowned for producing some of the most reliable and durable power tools in the industry. In fact, Milwaukee has been a leader in tool innova
    0 Commenti 0 condivisioni 334 Views 0 Anteprima
Pagine in Evidenza