

Arduino DIY CNC Engraving Project
If you're looking to build your own CNC router, you've come to the right place. Building your machine can provide a deeper understanding of the system itself and help with future troubleshooting that may be needed. Plus, it can be very fun and satisfying to design and build your creation, not to mention it will be customized to your needs.
A CNC router works similarly to a handheld engraver, but the X, Y, and Z movements are driven by an electronic system that allows for excellent precision and greater speed than manual operation. Arduino is a well-known open-source microcontroller board that has more than enough processing power to control the movements of a CNC router.
CNC Systems
Computer numerical control (CNC) is an automated form of system control used primarily for machining equipment, but also 3D printers. That said, today the term "CNC" is often used to refer to the machine itself, usually an automatic lathe, milling machine, or CNC router. In this article, we'll focus on the latter.
Like their manual counterparts, CNC milling machines are often used to cut softer materials, such as wood, plastic, foam, and aluminum. CNC routers typically run much faster than CNC milling machines and often have larger fixed tables.
Supplies

A standard set of tools, including screwdrivers, hexagonal keys, pliers, cutters Spindle, 3D printer, drill, stepper motor
Frame: plywood, aluminum profiles, 3D printed parts, 3D printed parts, lead screws, guide rails (or steel pipes)
Test materials: rigid foam, wood, acrylic, foam, aluminum
Firmware: GRBL, Marlin, etc.
Step 1: DIY CNC Router

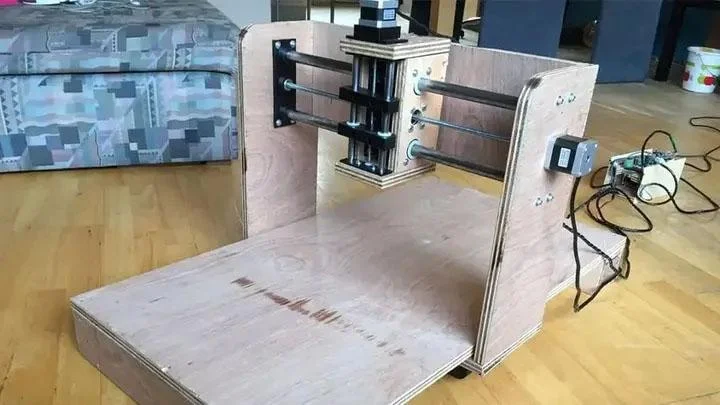
The so-called homemade DIY CNC router (CNC Router) is an Instructables project by Azielaan015. The frame of the machine is made of 18mm hardwood plywood, and the linear motion is achieved with steel rods and lead screws. Initially, the designer used a Dremel handheld rotary tool as the spindle.
The instruction page describes all the steps to prepare the parts (such as cutting wood) and assemble the machine, including the electronics. It also shows how to test it using a drawing pen and the Universal G-code Sender software. This project is a good choice for those who don't have a 3D printer.
Frame: Plywood
Test materials: Rigid foam, wood
Firmware: GRBL
Source: Instructables
Overall difficulty: Medium
Step 2: Dremels CNC

This is a very popular project by Thingiverse user Nicodem Bartnik. The Dremel CNC has its builder group on Facebook with different versions and adaptations, offering great user support and design options.
The Dremel CNC project relies heavily on 3D printing, so if you have a well-calibrated printer, the assembly process will be a walk in the park. Nicodem documents all the design and assembly steps in several videos, including the first steps after the machine is built. As its name suggests, this CNC router originally used a Dremel tool as a spindle, but the creator later updated the part to allow a standard 500-W spindle to be attached if necessary.
Frame: Aluminum extrusions, 3D printed parts
Tested materials: Wood, acrylic, foam, aluminum
Firmware: GRBL
Source: Thingiverse
Overall difficulty: Easy
Step 3: Sanchong CNC Machine Tools

The Triple CNC Machine from Arduino Project Hub user TheTNR is a three-in-one solution. Rather than just cutting and engraving like other CNC Routers, this device brings extra functionality from the start, as it allows the attachment of auxiliary tools such as a laser for cutting and engraving or a good old pen as a plotter.
This is another project that requires a lot of 3D printing. However, the main difference is the proposed spindle: a brushless motor, or as the creator calls it, a "drone motor".
Frame: 3D printed parts, lead screws
Tested materials: Wood
Firmware: GRBL
Source: Arduino Project Hub
Overall difficulty: Medium
Step 4: Multi-Print CNC

The Mostly Printed CNC (MPCNC) is a more complex project with a unique design. It uses steel tubing as its main structural component, and can easily balloon in size. The MPCNC is not a closed system, but rather a motion control platform that works with any type of machine, including 3D printers and vinyl cutters.
While the project provides a full list of materials and purchase links, many design choices are left to the user. That said, the recommended dimensions for the MPCNC are 600 x 600 mm (2 x 2 feet). For those with limited access to a 3D printer, or those who just want to buy all the required parts in one place, V1Engineering offers bundles in their online store.
While the recommended control board for this project is the UltiMachine, the creators make it clear that other boards, including Arduino-based solutions, are perfectly fine, and they even offer some support for those systems.
Frame: 3D printed parts, conduit rails (or steel tubing)
Tested Materials: Wood, Acrylic, Foam, Metal
Firmware: GRBL, Marlin, etc.
Source: V1Engineering
Overall Difficulty: Hard
Step 5: The Overpass

The overpass is a large (1500 x 3000 mm) CNC router designed by Instructables user Nishantkinshu. As they say, this Instructables page is not a build tutorial, but a detailed document describing how this sturdy CNC machine was designed and built.
This machine does not use 3D printing, all the parts are bolted together, making it easier to scale down if space is an issue. Nishantkinshu said that their machine cost a total of $3500 including shipping and took about 4 months to complete.
Frame: Aluminum profiles, plywood
Test materials: Wood
Firmware: GRBL, Marlin, etc.
Source: Instructables
Overall difficulty: Hard
Thanks to Luigi company for their support.
https://bit.ly/4cLeCMa