Steps on how to Knot or Restring Heirloom Pearls
Nothing more beautiful than a single strand of pearl jewelry's simple strand of the pearl jewelry will help restrain and keep your pearl jewelry safer and looking good. Pearls are delicate and keep absorbing anything which is near them. If they are not cleaned and returned regularly, they end up getting discolorations.
Steps for pearls restringing
Step 1: Preparing to string the pearls
- Choose on the string to use.
You can use so many strings, but the silk or nylon one could work best for you. The color of the tread is a crucial factor to consider depending on the color of the pearl.
- Assemble your pearls.
Get all the pearls and cut them off from the old string. Arrange them following how you want them to appear.
- Thread the needle.
Cut the piece of the thread, which will be enough for the restringing process. A string three times the intended necklace is perfect. Pull your line through the beading needle.
Step 2: Knotting
- Cut off the thread in about 10 inches of lengths.
Once the thread is ready, you can separate it into about three more delicate strands.
- Thread one of the thinner strands into the eye of the beading needle.
Once you manage to put it through, ensure to tie a knot for the strands to remain enclosed through the needle. It needs to hold the thread which will be used in stringing the pearls. Then leave the loop for later reuse.
- Thread on the loop.
Based on the desired size of your necklace, cut off the strand three times. Double it up and connect it to the loop that you had already made, then ensure to pull the ends in a longer distance.
- Attach the clasp.
From your original pearl jewelry necklace, get the clasp and connect them through the loop and thread it up. Move the threading needle through the pin and back to the end of the circle, tie a knot to the end of the clip to prevent slipping.
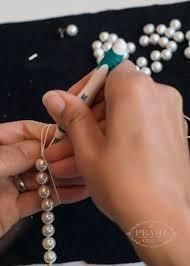
- String the pearls on the thread.
String the pearls in an orderly manner from the largest to the smallest.
- Tie a knot.
Go ahead and remove the needle and tie a double knot at the end of the strand containing the loops. It will prevent the pearls from slipping off.
- Knot the first pearl.
The knot should appear slightly outside the clasp for the metal not to destroy the first pearl. Push the first pearl closer to the knot and keep adding other pearls. On tying each of the knots, separate the threads and tighten them hard against the pearls.
- Attach the final clasp.
Cut the finish of the string and bunch after putting on the final pearl. Pull all the threads and tie a firm knot.
Step 3: Stringing and knotting,
String the pearls on the thread by pulling the line in the needle through each pearl's hole. Then fasten the clasp and tie it into the end of the grip. The last pearl should have a double string for the pearls to be secure. Secure the two sides of the lines by ensuring they are tied closely and tightly. Finally, attach the clasps. Tie the other half of the pins from the pearls to make the strands complete.
Conclusions
Pearls can be strung into accessories. The process of pearl stringing is so easy. It occurs as a pastime or commercial business. Stringing will help them stay close and prevent them from getting lost. It is a perfect way of storing all the pearls as well as restoring the worn-out ones.