What is Router Lift: Everything About Router Lift
When you work as a woodworker , or have a carpentry shop, there are all sorts of tasks required of you. The most common one that is probably done on a daily basis is routing. Routing is a technique that we can use to shape along the edge of boards. It’s a technique that is done with the help of machine called router in which there is an angled blade to cut away the wood.
The router that we use to perform routing can range from small to large sized routers. The smaller one can be used in small applications and the larger one is more suited for multiple operations. The best thing about the router is that you don’t need a power drill to do the job of routing. Visit servicezgo.com website for details information about woodworking and home improvement hand and power tools.
What is Router Lift

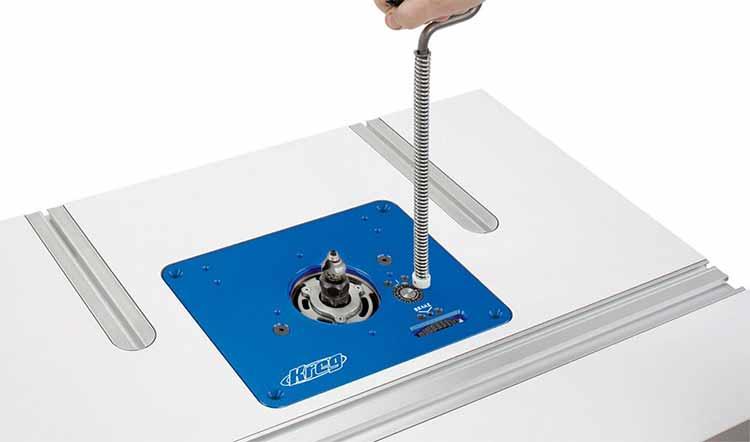
Router lift is a universal tool, that is designed to help you to remove the stock from the fence of your router. This will allow you to carry out other tasks and for routing. This type of tool is used in many woodworking shops, and home improvement work. They are usually attached on the top rail of a router table and are used to hold and reposition the wood from different angles.
Types of Router Lifting:
Wood Router Lift has different varieties that are provided depending on the type of work. These are available in different materials and designs. Here we discuss the basic types of router lifts.
- Manual router lift – This is the most basic type of router lift. In this, the router is supported by a device which uses a push or pull motion to be able to lift the router from its working position to the height that you like. Manual router lifts are inexpensive compared to other types of lifts but due to being manually operated it has a limitation on the weight of machines that can be handled.
- Electric router lift – This type of router lift is used for heavier machines. You can have electric hoist which will make it possible for you to handle larger sized routers with ease. The best thing about electric router lifts is that they are easy on operation and very smooth lifting process which makes it very safe to use.
- Hydraulic router lift – This type of router lift is used mostly in industries where large sized routers are required to be lifted for cutting purposes. In these lifts, a hydraulic pump is used for lifting and lowering the router.
- Chain driven router lifts – This type of lift is mostly employed when you require higher lifting range than other types of lifts would offer. It can be controlled with a hand crank and also it easily offers multiple configurations for operation.
- Collet or chuck-based router lift – This type of lift can be excessively priced but if you need precision based lifting mechanism than this might just be the best one for you to use.
In a Router Lift Design:
There are certain things that need to be kept in mind while designing the router lift. Few other things that you should keep in mind while using router lifts:
– Always make sure that the machine you are planning to lift has a weight capacity or is within the weight limit for safe operation of the router.
– Turn off the electricity and otherwise disconnect it from power supply. Remove any power cords, plug etc from it before lifting it up. This will minimize chances of an accident from happening due to a short circuit.
– The guide rails need to be locked properly for smoother operation of the lifts.
– Always make sure that the lifting gear is in good condition before you start using it. A worn out gear can easily slip and cause an accident.
– Make sure that you lift the router in a precise manner and if required use a help of another person while lifting it.
Router lifts are handy devices which are used to raise and lower the router. It makes the job easier for us as woodworkers to do precise routing tasks with ease.
How Does a Router Lift Work
A router lift basically work by using the gravity to suspend the router from the table. The router is provided with a support bracket which helps to hold it in place. Sometimes you need to add a mechanism in order to be able to return it safely back when required. Some of these mechanisms can lift the router using electricity but many other can use gravity as well.
These kinds of lifts are best suited for heavy duty work when you want to lift the machine for certain tasks. These lifts are mostly useful only if you have located yourself very close to your work space and you would like to handle your work easily and precisely, by holding your machine while you do some jobs on it.
How to Make a Router Lift
It is very much possible to make your own router lift which will reduce the cost of buying one. In this article you will get an idea on How to Make a Router Lift. Follow the 10 step by step instructions which are given below for making a Router Lift:
-
Tools You Will Need
Some of the importance tools must be need to make a router lift this are:
- Drill Machine and bits
- Table Saw
- 50mm float board or speed square (for measuring thickness of wood)
- Tape Measurer (try to follow the above mentioned measurements)
- Carving knife with a. 50mm blade
- Sandpaper
- Sanding machine (optional)
- Router (set aside which kind you want to make – fixed or sliding base and size you prefer)
-
Making the Base
Take care to follow the exact measurements while making the base. The base will require a router mounting plate and a bottom plate as well. The router mounting plate needs to be made of steel which should be 25mm thick and 160mm wide. The bottom plate should be 50mm thick and 120mm wide.
-
The Bottom Plate – Start with the base
Mark the router mounting plate out on the table. Then place the marking square at its center and draw a line from that mark to where you want your plate to stop. Cut this line through with a saw which can be made by using a miter saw which is available in any hardware store.
Quick Tip: You can also make this by using a circular saw which can be mounted on your router table, but it works best with a miter saw. As when cutting the base board through with this model, you will not have to allow for any cutting outside of your marked area because of its rigidity.
-
Start Making the Router Mounting Plate
The router mounting plate requires a 5mm thick aluminum 60mm wide which is used for making its face plate. The plate itself should be cut at 120mm by 160mm in size and at 25mm thick. A 2.5 mm thick aluminum block needs to be bolted to this plate with the help of a C clamp and the bolts need to have M8 thread size to hold it securely in place.
When this is complete, paint it with your favorite color or with some kind of iridescent color so that it gives an impact look to your design.
-
Making the Bottom Plate
The bottom plate should be made at the same size and dimensions as the router mounting plate which you have already made. This is where the variable depth of your router table comes in handy. You need to place a workbench or use a C clamp to fix this board in place and keep it stable so that it can be used for lifting your machine by using its weight.
Again, paint it up with color which will give a nice match with your material. More than one color is also possible if you would like to jazz up the looks of your design some more.
-
Making the T-Track
The T-track is required to be made of a hardwood which most of the time is used to make the base. The thickness of this wood will depend on that of your router mounting plate. You need to make sure that it is perfectly in line with its dimensions so that you can use it as a guide for sliding the plate on and off.
-
Trigger Mechanism
The trigger mechanism is required to be made from HDPE pipe or any other material which can be used for making these kinds of mechanisms. The bar which is attached to the router is made from another material which can be easily found in the market. The bar needs to be coated with paint so that it will not crack or break even on the most rugged of surfaces.
The mechanism itself must have a 5mm thick crossbar and it needs to be placed in such a way that it can counter balance to the weight of your router table as well. You must cut this crossbar into 40mm long pieces and place them together at 45 degree angle because if you would like to lock this unit into place you need to make sure that they are perfectly aligned.
-
Making the Jaws
The jaws are required to be made from a hardwood and each of these jaw is cut into two different pieces. One is attached to the front of your trigger mechanism and the other to be attached to the router mounting plate. In other words, you need to make a pair of these jaws but you need to keep their size separated a little bit in order for them both to hit the angled bar properly. These jaws should be placed at an angle of 30 degrees and they should be fixed together with bolts or screws as well.
-
Making The Plate Fixing Tool
This plate fixing tool is used in order for you to fix or remove your router mounting plate when it is up in your table. Your plate fixing tool requires a 5mm thick steel ring which is placed at the center of the plate. There are two holes which are drilled in this ring and they should be placed at 60 degree angle to each other. The bolts or screws need to be 10mm long and they should be tightened in place with these 2 bolts.
-
Making and Assembling the Plate
This step is quite simple because on top of the T-track you will have to put a set of plates for the router mounting plate. What you want to do is simply fit them together so that it sits snugly on top of your T-track rails. You can tighten the bolts or screws in place with a wrench so that the plates don't move around inside the track.
Tips/Note
Make sure that you carefully follow the above mentioned steps so that your router table will be made with great precision and detail. More than one person can do this job but the work is done in a faster manner if you have someone to help you out for certain tasks. You might need to ask for an expert’s help if you do not know how to use a few power tools or what wood will be appropriate for making each part.
What is a router lift used for
Using a router lift is the best way to easily attach your router to your workbench or table while you are using it. The device is usually made with metal and it has a strong clamp which securely holds the machine into place. This means that you would not have to hold on to the machine while using it at all times as you can use your own hands for this purpose. However, there are several DIY router lifts which are actually a lot easier to make and they can give you the same functionality.
Conclusion
I hope this article you will learn everything's about Router lift. What is router lift, how make router lift and many information of router lift. In this article I am tried to give more information of router lift. If you have any question about this article then ask in the below comment section and I will try to solve your problem as soon as possible. Thank you for reading this article.